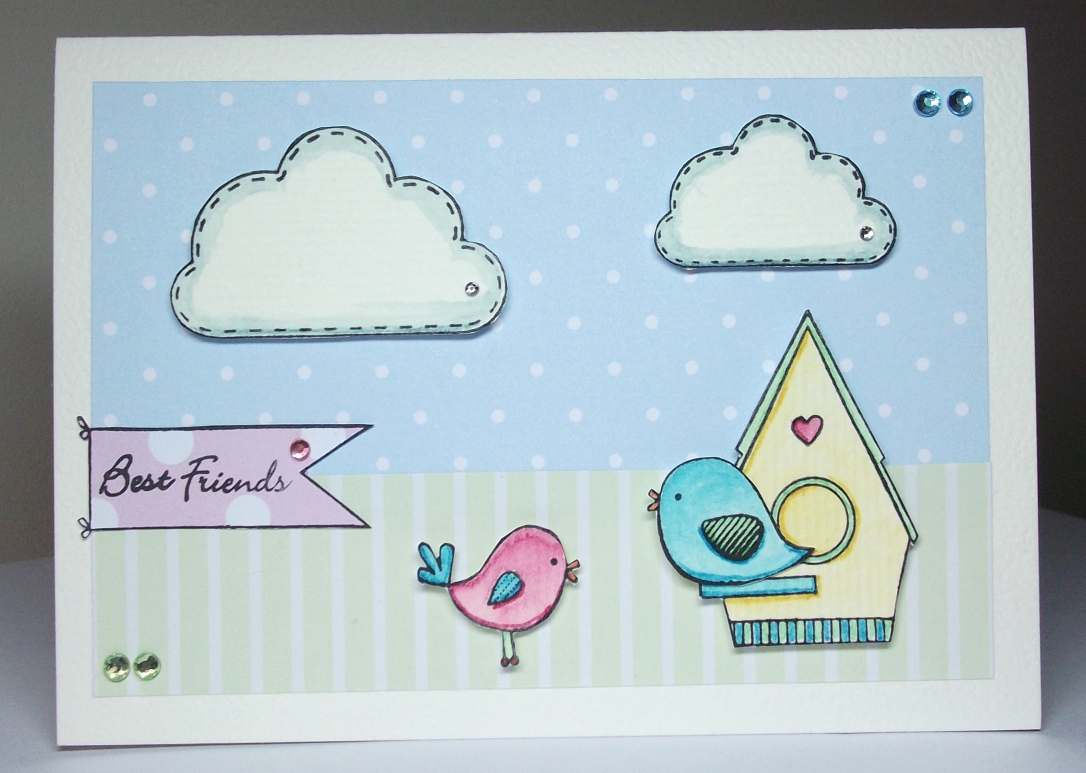
A card doesn't have to be perfect - just from the heart ...
Showing posts with label animals. Show all posts

Thursday, 13 September 2012

Collage Owl


Mini-Card:  FUN FOR BIG AND LITTLE KIDS!


Threw this one together today, felt like making something a little bit fun :)

  1. It's pretty simple really:
  2. On white paper (I used normal copy paper), scribble with a watercolour pencil, then roughly spread the colour around with an aqua brush (or brush and water) so that you get a wash with the scribble still visible in it.  Alternatively you could just use a patterned paper, it's up to you.
  3. Once the paper is dry, tear out an owl body shape so that the edge of the owl shows the white tear of the paper
  4. Tear some rough wing shapes out of newspaper or a book, create eyes with small circle punches or use googly eyes
  5. Glue a stick to your card and hovering just above the stick, glue your owl pieces onto the card.  Draw a beak, 'feathers', ear detail, and legs onto the card
  6. Roughly cut out little leaves and stick them on the card around the stick to create a tree branch - I created the paper for the leaves the same way that I created the paper for the owl
  7. Apply your greeting however you want!  I liked keeping the "torn" theme going.  My greeting was simply printed from the computer and cut out.

Done!


Happy Hooting!
 
Dani :)


Friday, 3 August 2012

Happy As A ...


PIG IN MUD!


My friend and I were at the shops last night buying gifts for 6 year old girls (panic!) and in the card section my friend happen to exclaim at the cuteness of a pig card.  So, since I wanted to avoid cleaning today anyway, I made one for her!

...probably she just awww'd at it because she thought it would be cute for a 6 year old girl.


First of all, I cut out a bunch of pink circles with some punches I have.  Large one for the body, smaller one for the head, even smaller for the snout and teeny ones for the ears!  I edged them all with a similar pink ink.


Piece together as above picture.  To add some dimension, use foam tape between the head and body and the snout and head.  Attach the little ear circles to the BACK of the head.  Find some silly goggle eyes and glue them on.  And finally, use a regular hole punch to create nostrils with black card.


I wanted to have nice rounded feet but because the legs are really no more than a centimetre wide, it was a little tricky to achieve ...so I went for pointy, still using my corner punch to make it as neat as possible.  Of course, me being me, I changed my mind later on and quickly rounded off the ends :)

Anyway, I inked the edges of the legs just as I did the circles.


Since he is a pig in mud, I used a brown ink pad and some cotton buds to gently apply some "mud" to the feet.  I started with a rolling action, to carefully apply the ink, then started to smudge it around a bit.


Stick the legs to the back of the body so that they're the desired length.  Smudge some more "mud" over the rest of the pig, wherever you like really!  No sense in having a happy pig in mud if it's clean!

I also used a cotton bud with pink ink to accentuate the ears a little, as well as shadows at the tops of the legs and under the chin.  I drew a mouth directly onto the pig's face because, you know, it's happy!  Plus without a mouth it was starting to give me the creeps..

I created the pig pen mud with brown card that I cut a gentle wavy design into the top of.  I then used the off-cut wavy design as the front layer of mud that the fence posts sit behind.  The fence is made, obviously, from ice cream sticks.  For the standing posts, I trimmed them down to about 3/4 length.  I roughly, but generously, rubbed a brown inkpad across each stick before sticking the mud and fence onto the card.

The order is:  Mud, fence, mud top layer, pig.  I used foam tape between the mud top layer and the fence; and the pig and the fence.  The pig's feet are stuck directly onto the top layer of mud.

I drew a curly tail directly onto the card (it's short in this picutre but you'll see I later extended it).  I had big plans for using string or wire or something curly but at the end of the day, this seemed easier  and less busy on an already busy card.


Next I decided (yes, I was working without a plan!) to add some colour so it would pop a bit more.  I created some tufts of grass by cutting out thin green triangles and then fussy cutting the spikes at the top.  Then I put a little tape behind them, slotted the bottom tips of them under the mud, so they were positioned against the fence, and stuck them down.


See?

I also decided to shorten the top layer of mud a bit.


The finishing touches:

  • Lengthened the tail
  • Using the same technique as with the grass, I punched a circle and fussy cut spikes to create a little sun to fill the top right corner  I trimmed it to fit the card after I stuck it down so that it would fit the corner perfectly.
  • Fussy cut a little apple and leaf for the bottom right corner, again just to add a little colour
  • Used my computer to create the "Happy as a ..." and " ... in mud!", cut them out and stuck em down!
  • Used colour markers to draw tiny highlights onto the apple, leaf, grass and sun.
  • Done!


Happy as a ...

Dani :)


Friday, 13 July 2012

Whale Of A Time!


HAPPY ANNIVERSARY! :)


This year, my husband and I will have been married for 8 years - together over 10 years :)  We're celebrating this by taking a little whale watching cruise!  So in honour of that, I've themed the card I'm giving him.

I make the effort to annoy my husband and show him EVERY card I make.  He's patient but only glances at each card and says "Cool." - it's not his cup of tea.  So it's become tradition for me to make him cards - mostly because I like being annoying!

I quickly got over my phase of thinking he'll cherish these cards, so I never make much of an effort - and generally I like to make them super cheesy!  Strangely, they often end up being amongst my favourites, anyway.

This card was simple:

  1. First I used publisher as a quick and easy way to find a  cute picture of a whale - I love this one because it was a good cut out that sits neatly at the bottom of the card.  I also created my greeting on publisher.
  2. I fussy cut the whale and cut use a paper trimmer to cut your greeting strips.  When I fussy cut the whale, I trimmed off the spurt of water.
  3. I cut white card 12cm x 24cm and then folded in half.
  4. I cut a strip of blue card, about 3cm wide and slightly longer than the card.  I used a border punch to create the "waves".
  5. I edged the blue card with dark blue (Versa Magic 'Night Sky') and stuck it onto the bottom edge of the card.  I trimmed the sides and reinked the side edges of the blue.  (I'll admit now, also, that I trimmed the entire card a little, which is why it looks a little more slender than square).
  6. I stuck the whale onto the bottom edge of the card, over the blue card.
  7. I created my own spurt out of sticker gems, stuck on the greeting strips and embellished the top left corner with a few more sticker gems

And that's all there is to it!  I plan to stick a folded up "keepsake" copy of the booking for the whale cruise inside the card :)

Now I'm off to stock up on Sea Legs!


Happy Anniversary! :)

Dani :)


Saturday, 19 May 2012

Kids Corny Cards


ANIMAL JOKE MINI BIRTHDAY CARDS


I've been busy busy busy in recent weeks with my son, which got me thinking I don't really make that many kids cards - challenge accepted!

Being a weekend chock-full of soccer, I had limited time to get stuff done so went for some very simplistic but cute cards.  Plus kids are not so gentle, let's be honest.  Once I spent DAYS making my son a giant (binder sized), super amazing mickey mouse card with disney characters that sprung out when he opened it.  He destroyed it in the blink of an eye.  He now appreciates even the most basic card that I make - he's at an age where they're ALL amazing to him!  I love that :)

No step by step photos for this lot, but it's not really necessary.  The animals were made with die cutters and my cuttlebug - Lion, Dog and Kangaroo are Cuttlekids dies (why should kids have all the fun??) and the Penguin is by QuicKutz.  The rest is faily self explanatory, with die-cut animals stuck to white card, stuck to colour card, stuck to base card.  I then found some corny animal jokes on the internet and, after typing it up and print it out, I put the question on the front and the answer (plus Happy Birthday!!) on the inside.

Finished up with some cute little buttons (one of my favourite embellishments!) and jewels :)


Kids could easily make cards like this too!

The (terrible) jokes I used are as follows:

Q:  On what day do Lions eat people?
A:  Chewsday!

Q:  What do Penguins sing on a Birthday?
A:  "Freeze a jolly good fellow!"

Q:  What do you get when you cross a Kangaroo and a Sheep?
A:  A woolley jumper!

Q:  What dog loves bubble baths?
A:  A Shampoodle!!


Happy Joking!

Dani :)

Saturday, 21 April 2012

New Baby Birds


LITTLE BIRDY NEW BABY CARD

Congratulations to my dear friend Melissa!!


No step by step photos this time, peeps, sorry!  It's pretty simple though :)

(Incidentally, if you're not into stamps and colouring, you can buy these kaisercraft sets as stickers!)
  1. Fold a 21 x 15cm piece of pink card in half
  2. Cut a piece of watercolour card to be about 9.5 x 12cm
  3. Using KaiserCraft Fine & Sunny stamp collection, stamp the row of flags at the top and the three little birds at the bottom.  I have used a corner rounder and inked the edges also
  4. Colour the stamps in your favourite method, in this instance I have employed my usual technique of colouring with water soluble pens and an aqua brush - very simply doing a bright single layer colouring and then using the pen tip of the markers to accent the top edge of each flag and then bottom V of each flag.  I also used the pen tip to accent the underneath of birds and their wings and tails
  5. Cut another piece of watercolour card (only so that it matches the main piece) 4 x 8cm.  Cut a piece of pink card (the same as your main card) 5 x 9cm.  Round the corners on both
  6. Put lettering or greeting on the small white card.  I have used chipboard stickers that are covered in fabric (pre-made because I don't have THAT much time!!) but you can stamp or use rub-ons or stickers etc
  7. Embellish with sparklies and use doublesided tape to stick the small white card to the front of the small pink card and then the pink card to the centre of the large white card
  8. Stick the large white card to the main pink card using double sided tape.  Keep the top, left and right margins even so that there is a large margin below.
  9. Punch two holes evenly at the bottom of the card.  I have actually (stupidly) done mine too big.  Smaller is better!  It's fiddly to get the ribbon through but holds the ribbon in place better.
  10. Choose your ribbon!  I've used a gauzy yellow ribbon and a thin pink ribbon and I threaded them through a diamante buckle first.
  11. Poke the ends of these ribbons through the holes from front to make then cross them over at the back and tug them back through the opposite holes.  If they don't stay in place on their own (mine didn't this time!) then hold down at the back with some clear gift wrapping tape
  12. Trim the ribbon and seal the ends with either glue or a bic lighter (gently and carefully, to melt the ends - sometimes this DOESN'T work!) to prevent the ends from fraying
  13. Done!


Here's another card I made with the same stamp set :)  Pretty self explanatory but feel free to ask any questions!


Happy Carding!!

Dani :)


Saturday, 7 April 2012

Colouring with Water Soluble Inks


HOW TO USE WATER SOLUBLE PENS TO COLOUR A STAMPED IMAGE


I don't consider myself an artist by any means, but I get a tiny thrill whenever I produce a little picture like this that I can share with my loved ones via greeting cards.  I especially adore adorning cards with these gorgeous mouse stamps from Penny Black!

Copic markers are all the rage now and they produce beautiful results.  But my messy, heavy handed style isn't really suited to them, and I find these water soluble markers much more cost effective because you don't GENERALLY require shades.  It's simply a case of adjusting the water to ink ratio when colouring to get the shades you want!


First of all you want to stamp your image onto watercolour card.

You can do this on regular cardstock, but you may get pilling, bleeding, tearing and holes.  Watercolour card is made of cotton and allows you the freedom to move ink and water around a lot without damaging the image.

Also very important is the type of ink you use - you want a fast drying solvent ink.  I recommend StazOn.  You basically want something that dries quickly and won't be smudged by water!


Next select your colours!  You need to use water soluble markers such as these ones from Stampin' Up or Tombow markers.  They are double-ended markers - one end has a large brush-style nib and the other has a fine pen nib.
The above markers are all the markers I use in the Tea Cup photo - not many!


Rather than scribbling straight onto the page, you want to scribble some ink onto a plastic surface, using the brush end of your marker - I use one of my stamping acrylic blocks (just make sure to put some white paper underneath so you can see the ink well).

Next you need an aqua brush.  You can use a standard brush and dip it in water but you get better control using these aqua brushes because they are designed to maintain a good level of moisture on the bristles.

Depending on how much colour you want, use the damp aqua brush to pick up some ink.  I recommend starting with just a little bit of ink until you can determine how dark you want the colouring to be.


Your first colouring layer is a gentle wash of colour over the image.  Moving in a circular motion can give a nice even application.  But it really depends on what kind of look you're going for!  The beauty part is that watercolour isn't supposed to look perfect and neat.


This is the image with the wash layer finished.  Now you need to use the same colouring technique to add any additional layers of colour. 

In this layer you can add lighter and darker shades if you want, but the shadows are "officially" done a little further on when you can take a look at the almost complete image and see where you think shadows should be.


This is the image now that the additional layer of colour has been added!  I have added orange to the mice, allowing some of the yellow to show, and coloured their cheeks with the light pink.


Now you use the fine tip of the pen to create accents and definition to the image.

For instance, in this picture I have used the pale pink to colour the tail and noses (as they are quite fine).  And I use the orange around places like ears and arms where there would be bold shadows.  I also use a red marker to colour the tiny berries on the mug and the green marker to add some definition to the leaves.


And your final step - the shadows!  Figure out where you think your light source is and do darker shades accordingly.  Don't stress about it being perfect - mine aren't but still look effective!


And there you have it, the completed image!  I just love the softness of the colouring and the casual, perhaps old-fashioned, feel it has!

Here are some more of my mice (I am obsessed with them!), of which I actually have a LOT more!


Happy Colouring!
Dani