A card doesn't have to be perfect - just from the heart ...

Sunday 27 May 2012

Apron Card


SWEET LITTLE APRON CARD


Bear with me, I've not charged my camera battery yet!  So this is all photographed with an iphone - yuck!

I have seen these cards here and there on the internet and think they're just gorgeous!  I'd love to be creative enough to create little rolling pins and such for the pocket, but for this first attempt, I dont think I'll push my luck :)

This is a card that would be great for people who love cute things, love cooking or love gardening.  I put a thank you message on it because it looks, to me, like a card that is perhaps ideal for for someone whose home you stayed in - an acknowledgement of their hospitality!


So first of all, Google (or create) a template of an apron.  Fold your main card in half and place the template along the fold and cut around it.


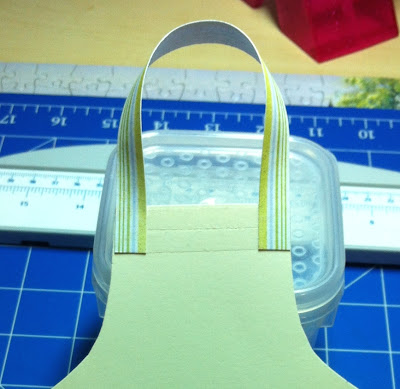
The first thing you want to put on your apron is the loop for the neck.  You can use either ribbon or cardstock / paper for this.  In this instance I have used paper.  I cut a strip of card 15cm x 1cm and secured to the top front of the card, in a loop (see above), with double sided tape.


On top of the neck loop, put a decorate "frill".  I used a border punch and some white cardstock to create mine, but you could also use some lace for a more 'authentic' look.  To fit my apron, I created a border punched length of card that was 6cm x 2.5cm.  Apply more double sided tape to the top of the apron and attach the frill.


Now cover the front of the apron with double sided tape and lay it face down onto the back of the patterned card you will use for the apron.  Make sure that the top edge of the card is exactly where you want it at the top, because you can't trim around the detail you've already put down!

If you want, you can use the template to cut out an apron shape and stick it on, but I find this quicker and less likely to be stuffed up by crooked applications or edges that don't quite meet.


Cut around your card ink the edges (carefully, lightly across the top so that you don't ink the frill - or if you plan ahead better than me, ink the top edge before you stick it down!!).

Now it looks a lot like an apron :)


Pocket time!

Cut out a rectangle of a contrasting cardstock colour - mine is 8.5cm x 6cm.  Round the two bottom corners.  On the back, mark 1cm down on both sides of the pocket.  That is the stopping point for the double sided tape you will place around the edge of the pocket.

You can now stick the pocket onto the front of the apron.


What I thought would be cute is an insert (for a message), for the pocket, that can be pulled out.  I incorporated the pocket "frill" into this.  I had the frill 8.5cm x 2.5cm.  I cut out cardstock that matched the base card (5.5cm x 6cm), rounded the corners and stuck it to the back of the frill, with mo more than a 1cm overlap.

I put another strip of paper that matched the apron (1cm x 8.5cm) that I placed along the bottom of the frill with an overhang of only a millimetre or two.  This was just to make it look a little nicer.

Stamp or write a greeting on the little card.


Slide the insert into the pocket.  It's starting to really come together - we're on the home stretch now!!


Now, if you're into sewing, by all means (before attaching the pocket!) stitch the edges of the card!  However, I'm a little "sewing challenged" so I drew my stitching on - around all edges of the apron and pocket.

Now that's done, it's time for decorating!  Go crazy and decorate your apron :)


There we go - a cute little apron card! :)


Happy Baking!

Dani :)


Friday 25 May 2012

Ice Cream Card


DELICIOUSLY SWEET

ICE CREAM & WRAPPER CARD


Full of apologies already - my camera battery is flat and I can't find the charger so I can't do a step by step photo instructional.  I took this photo with my iphone in the middle of the night - it will have to do!  FYI:  That bow is actually a pretty pastel yellow :)

Anyway, it really is a simple card!

Ice Cream

  1. 2 pieces of coloured card 5cm x 8cm each - round the corners
  2. 2 pieces of white card 5cm x 8cm each - round the corners
  3. Pick your "eaten corner" and use a round scalloped punch to make a "four tooth" bite mark on the coloured card and a "three tooth" bite mark on the white.
  4. Line up and stick each white piece to their pink piece
  5. Stick a paddle-pop stick to the back of one ice-cream piece using double sided tape.  Cover the back of the stick and the icecream with more double sided tape and then line up the other icecream piece and stick them together
  6. Trim if necessary.

Wrapper

  1. One piece if coloured / patterned paper/card 7 x 22
  2. Fold the coloured paper in half and test that the icecream will fit - trim if necessary
  3. At the open end (opposite to the folded end), use a decorative edge punch across the edge, per the above photo.  At the folded side, round the corners.
  4. Place double-sided tape along the sides and stick the folded paper together to form a pocket, with an opening at one end (the decorative end)
  5. Ink the edges
  6. Create your greeting (for both icecream and wrapper) on your computer, print and cut out.

From there it's up to you how you want your greeting to look and how to embellish your wrapper and icecream!

Gently slide your icecream in its wrapper and it's ready to sweeten someone's day!


Happy Desserting!

Dani :)


Thursday 24 May 2012

Templates - Links


LINKS TO SOME GREAT FREE PAPERCRAFT TEMPLATES!


For some great shaped cards, boxes and other papercrafting ideas, here's a few links to get you started!


MEL STAMPZ


Happy Fussy Cutting!

Dani :)


Wednesday 23 May 2012

Cutie Dress Card


SWEETIE-PIE DRESS CARD


This is a card that makes me go "Awwwww" and then hope desperately that a little girl's birthday will hurry up and get here so I can churn one of these out!

What can I say?  Easy.  Quick. Super Adorable.


Go Google crazy and find a template online for a dress.  There are heaps out there, I liked the simplicity of this one - easy to cut out!


Fold your card in half and then lay the dress template over the top, with the shoulders along the fold (unless your template specifies otherwise).  Cut around it so that it comes out per the picture above.

On the front, lay out plenty of double sided tape.


Select the main colour/pattern you want your dress to be and stick your card to the back of it.  Cut around the card.  This is quicker and easier than using the template again because then you have to stick it on straight and trim here and there.  I'm a fan of cutting corners hehe!


So this is what you should have once you have cut around the card, which is stuck to your main dress layer.


Ink around the edges of the dress - not only does this help hide little imperfections, it just makes the dress "pop" a little more.  Keep it fairly subtle though!


Under the arms, going across the dress, run a line of double sided tape that folds over onto the inside of the card.  This is to hold the ribbon on.


Stick your ribbon along the tape and fold it over to the inside of the card also.  If you're keen, you can cut out another dress to stick to the inside of the card to hide the ribbon, but that's personal taste and I'm far from being a neat person!

Apply some teeny little roses to the centre of the ribbon using a strong glue.  Place some stick on pearls as buttons.

Decorate it how you want, really!


And there you have it - one cute little dress card :)  There are heaps of templates for all sorts of things on Google - why stop at dresses?


Happy Dress-Making!

Dani :)


Monday 21 May 2012

Kids Keepsake


KIDS HANDPRINT KEEPSAKE CARD


Now THIS was a quick card to make!  I can't take credit for the design - I saw it on Pinterest and HAD to give it a go.

Brin helped me with it a little - I think this is a terrific project to share with a child.  You don't have to stamp the greetings, your child could write it.  And they can embellish it any way they want!

Fantastic for mother's day, birthdays, christmas.  I just decided to make them for no good reason other than I think Brin's grandparents and aunts and uncles will get a kick out of it :)


Using chipboard, trace around your little one's hand and cut out to create a template.  Really you could use anything, even newspaper, but I like the idea of using something as tough as chipboard so that it doesn't move around when you're tracing around it, plus it lasts and can be potentially kept as my OWN keepsake :)


Place the traced hand onto your chosen paper and cut out two hands.  If you're using paper that has a different colour on each side, make SURE that you appear to have a left hand and a right hand otherwise they won't go together!


Use a 30 x 5cm strip of cardstock as the middle of your card.  Consatina it, folding every 3cm.  You want the two ends to be folded in the same direction, per the picture above.


Stamp the greeting "I Love You" on the hand that will be the front of your card.  Stamp the greeting "this much" in the way you prefer, such as above, across one side of your folded cardstock. 

Alternatively, your child can write the greetings.  Brin "helped" me stamp, thus the very rustic look hehe!


Attach the folded cardstock to the "inside" of the hands, as shown above., with the "this" end of the card attached to the inside of the front hand.  If you want to put a greeting, you can do what I did and put it on the back of the card.  I had Brin write his name on the back


.

Embellish as you, or your child, want - this is what I threw together quickly!


Happy Clapping!

Dani :)


Saturday 19 May 2012

Kids Corny Cards


ANIMAL JOKE MINI BIRTHDAY CARDS


I've been busy busy busy in recent weeks with my son, which got me thinking I don't really make that many kids cards - challenge accepted!

Being a weekend chock-full of soccer, I had limited time to get stuff done so went for some very simplistic but cute cards.  Plus kids are not so gentle, let's be honest.  Once I spent DAYS making my son a giant (binder sized), super amazing mickey mouse card with disney characters that sprung out when he opened it.  He destroyed it in the blink of an eye.  He now appreciates even the most basic card that I make - he's at an age where they're ALL amazing to him!  I love that :)

No step by step photos for this lot, but it's not really necessary.  The animals were made with die cutters and my cuttlebug - Lion, Dog and Kangaroo are Cuttlekids dies (why should kids have all the fun??) and the Penguin is by QuicKutz.  The rest is faily self explanatory, with die-cut animals stuck to white card, stuck to colour card, stuck to base card.  I then found some corny animal jokes on the internet and, after typing it up and print it out, I put the question on the front and the answer (plus Happy Birthday!!) on the inside.

Finished up with some cute little buttons (one of my favourite embellishments!) and jewels :)


Kids could easily make cards like this too!

The (terrible) jokes I used are as follows:

Q:  On what day do Lions eat people?
A:  Chewsday!

Q:  What do Penguins sing on a Birthday?
A:  "Freeze a jolly good fellow!"

Q:  What do you get when you cross a Kangaroo and a Sheep?
A:  A woolley jumper!

Q:  What dog loves bubble baths?
A:  A Shampoodle!!


Happy Joking!

Dani :)

Tuesday 15 May 2012

When I can't sleep ...


SPOTTY CARD


This is a great card to make when you're in a hurry!  Quick and simple but a card that will please most people - suitable for babies, girls, grown up women and even (with the right browns and blues) guys.

You can change so many aspects of the design, based on the size of the card, the size and shape of the greeting, the papers you use (cork for men is awesome!) and how you want to embellish it.  When I make this card, the spots are always the same size (roughly 2cm diameter).  I alter where and how I have the ribbon, the style of the greeting, the types of buttons...

I made this at 1 in the morning so bear with me!


First of all, punch out a bunch of circles - don't worry about how many, do plenty so you can pick and choose colours and be able to muck around with the layout - so aim to have too many.

Ink the edges of the dots.


Get a small piece of card, suited to the size of your greeting.  Stamp the greeting!


I then chose to round the corners of the greeting, ink the edges and pop a tiny bit of bling on it :)

I generally mount my greeting for this card on foam tape.  In this instance, I mounted the left hand side onto with foam tape.


Create a loopy piece of ribbon.  To do this, I cut a decent legth of ribbon, stuck one end on a paper reamer (big fat needly thing!).  I then looped the ribbon back and forth, giving each loop a little more length (well, that was my intention but I ran out of ribbon!)

Firmly holding the ribbon in place, remove the reamer and put a mini brad through the hole.  Doesnt matter what colour, it will be covered up!


Figure out where you want your greeting and place the foam tape on the left end of where the greeting will sit.  Place some double sided tape along the rest of the length and add a dollop of glue for good luck!  Stick your loops on top.


Put some more double sided tape on the back of your greeting, pop a dollop of glue at the end with the loops and stick it down!  Hold it down for a while to make sure it stays where it should :)


Arrange your dots!  Stick them down with double sided tape :)


Pop a few buttons in the centre of some of the dots.  I used teeny tiny cuties, but you can use bigger buttons :)  I also rounded the edges of my card, given the "roundness" of the theme of the card.


Happy Spotting!

Dani :)


Sunday 13 May 2012

Dressed Up Window Card


HEART-SHAPED WINDOW CARD


It's Mum's Day so I treated myself to some time in peace and quiet, tinkering at my desk.  I am definitely feeling the love today so went for a lovey theme!

I really enjoyed making this card because it's a quick and simple card but so dimensional and sweet!  You could trade the little hearts for butterflies or whatever shape you want, likewise the window.

I have used a Nestabilities set, however there are all kinds of dies and punches you could use for this - I've got some cute leaf punches so I'm thinking an autumn themed card like this might be my next project :)


First of all you need two pieces of white card - one that is 20x10cm (which you fold in half to be the card) and another 10cm square, which will be the front of the card.


After you have folded the piece of card in half, open it up and lay it out on your cuttlebug, lay the square card on top, exactly how it will sit once it is stuck on.  Centre the Nestabilities heart shaped cutting die (I used the second largest) on top of the square and cards and carefully run through the cuttlebug.


This will cut through the main card and the square piece that will mount on the front.


Using some red card, use the snallest Nestability heart and cut out eight hearts.


Cut some nylon or cotton white thread - 3 lengths of about 15cm.  Turn your hearts upside down and on four of them place some double sided tape going up the centre of the hearts.  Place your thread along the centre of the heart (as above) and place another piece of double sided tape on top, going across the widest part of the heart - this will make sure the hearts stick together properly and hold the thread in place.


You want the hearts to be laid out per this photo.

2 of the threads will have the heart towards the top of the string (make sure there is a good inch or so of thread above the heart.  The other thread has two hearts on it, about halfway along with a centimetre or so between the hearts.


Turn over your square piece of card and lay down plenty of double sided tape.  Pull the threads taut as you position as above.  The threads needs tension so that the hearts are suspended properly.  Don't cut off the extra lengths of thread.

Lay lots more tape on top of the last lot - yes, I'm paranoid about threads pulling free - and then stick the excess thread back on top of that.  Trimming the threads short will just encourage them to eventually wiggle loose - this way, you're making TRIPLE sure that everything is secure!


Now carefully line up and stick together the square card and the main card, so that the large hearts match up neatly.

That's basically it!


As you can see, I have chosen to stamp a sentiment inside - I like the look of it, but you don't have to put a sentiment on it if you don't want.

I just close up the card and lay it flat and then mark with a pencil, between the two centre hearts, where I want the sentiment to be.  Then open her up and stamp!

Any additional greetings and writing, I think would be better on the back of the card so as to not ruin the visual effects.


Happy Cutting!!!

Dani :)