SWEET LITTLE APRON CARD
Bear with me, I've not charged my camera battery yet! So this is all photographed with an iphone - yuck!
I have seen these cards here and there on the internet and think they're just gorgeous! I'd love to be creative enough to create little rolling pins and such for the pocket, but for this first attempt, I dont think I'll push my luck :)
This is a card that would be great for people who love cute things, love cooking or love gardening. I put a thank you message on it because it looks, to me, like a card that is perhaps ideal for for someone whose home you stayed in - an acknowledgement of their hospitality!
So first of all, Google (or create) a template of an apron. Fold your main card in half and place the template along the fold and cut around it.
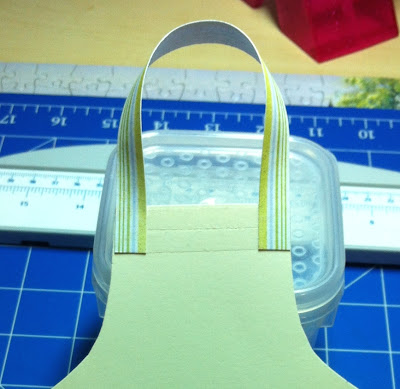
The first thing you want to put on your apron is the loop for the neck. You can use either ribbon or cardstock / paper for this. In this instance I have used paper. I cut a strip of card 15cm x 1cm and secured to the top front of the card, in a loop (see above), with double sided tape.
On top of the neck loop, put a decorate "frill". I used a border punch and some white cardstock to create mine, but you could also use some lace for a more 'authentic' look. To fit my apron, I created a border punched length of card that was 6cm x 2.5cm. Apply more double sided tape to the top of the apron and attach the frill.
Now cover the front of the apron with double sided tape and lay it face down onto the back of the patterned card you will use for the apron. Make sure that the top edge of the card is exactly where you want it at the top, because you can't trim around the detail you've already put down!
If you want, you can use the template to cut out an apron shape and stick it on, but I find this quicker and less likely to be stuffed up by crooked applications or edges that don't quite meet.
Cut around your card ink the edges (carefully, lightly across the top so that you don't ink the frill - or if you plan ahead better than me, ink the top edge before you stick it down!!).
Now it looks a lot like an apron :)
Pocket time!
Cut out a rectangle of a contrasting cardstock colour - mine is 8.5cm x 6cm. Round the two bottom corners. On the back, mark 1cm down on both sides of the pocket. That is the stopping point for the double sided tape you will place around the edge of the pocket.
You can now stick the pocket onto the front of the apron.
What I thought would be cute is an insert (for a message), for the pocket, that can be pulled out. I incorporated the pocket "frill" into this. I had the frill 8.5cm x 2.5cm. I cut out cardstock that matched the base card (5.5cm x 6cm), rounded the corners and stuck it to the back of the frill, with mo more than a 1cm overlap.
I put another strip of paper that matched the apron (1cm x 8.5cm) that I placed along the bottom of the frill with an overhang of only a millimetre or two. This was just to make it look a little nicer.
Stamp or write a greeting on the little card.
Slide the insert into the pocket. It's starting to really come together - we're on the home stretch now!!
Now, if you're into sewing, by all means (before attaching the pocket!) stitch the edges of the card! However, I'm a little "sewing challenged" so I drew my stitching on - around all edges of the apron and pocket.
Now that's done, it's time for decorating! Go crazy and decorate your apron :)
There we go - a cute little apron card! :)
Happy Baking!
Dani :)


No comments:
Post a Comment